Downgrading iOS versions on iPhone, iPod touches, and iPads is a very hot topic among the jailbreak community. There hasn’t really been a way to do it without Apple signing the version you are downgrading to in a long time. However, recently a tool called ‘futurerestore’ or ‘Prometheus’ has been released by Tihmstar, giving people the ability to restore to unsigned iOS versions if you have the correct SHSH blobs for it.
This tool is quite complicated to use, and isn’t 100% finished yet, but as long as you do everything correct, you can restore an iOS device to an unsigned iOS version. The tool is currently only compatible with macOS and Linux, but Windows support should be coming in the future. This downgrade method is also not a perfect one. It does have a few down sides and side effects. This mainly being that it doesn’t work all the time.
So why would you want to restore to iOS 10.2? The main reason everyone would want to restore their device to iOS 10.2 is to get a fresh install, ready to be jailbroken, without having to update to the latest version. iOS 10.3.1 is currently the only version being signed by Apple, which cannot be jailbroken at the moment. This would normally mean that if something happened to your jailbreak forcing you to restore you device, you would also have to update to the latest version and lose your jailbreak. However. using this method you can restore to iOS 10.2 without having to update.
It should be noted however, that this will only work while Apple is signing iOS 10.3.1 (or a newer version that has a SEP compatible with iOS 10.2). This means that when future versions of iOS are released, you may not be able to use this method to restore back to iOS 10.2. This method also requires that you have valid SHSH2 blobs saved for iOS 10.2. If you do not have these saved already, it is too late to save them as Apple no longer signs iOS 10.2. You should always save SHSH2 blobs for every iOS version.
There are two methods of restoring to iOS 10.2 while it is not signed by Apple. The first one requires you to be jailbroken on iOS 10.0 – 10.2 using at least beta 6 of the YALU jailbreak (guide here). This method is almost guaranteed to work as long as you have valid SHSH2 blobs saved. The second method is for devices that are not jailbroken (e.g. are on iOS 10.2.1). This method is not guaranteed to work, and if it does work could take hours or days to complete. It relies on the device generating the same nonce that is in your SHSH2 blob, which isn’t always likely to happen.
Requirements & Notes
- This downgrade requires you to have SHSH2 blobs saved for iOS 10.2. If you do not have them saved already, you cannot do it anymore as iOS 10.2 is no longer signed by Apple.
- This tool is currently only compatible with macOS and Linux. Official Windows support should be added at some point. If you are using windows you can install a macOS virtual machine.
- When using this method to restore to iOS 10.2, Touch ID WILL work. Sometimes when using this method Touch ID wouldn’t work after the restore, but iOS 10.3.1 and iOS 10.2 have the same SEP, so Touch ID works perfectly.
- This downgrade should work with all 64-bit devices, and maybe 32-bit devices, as long as you have valid SHSH2 blobs for iOS 10.2.
- This will restore your device and erase all data on it. Make sure to backup in iTunes if you want to keep any data on your device.
- This exact method will only work while iOS 10.3.1 is being signed by Apple, however it is possible to tweak it if you use files from the latest IPSW file instead.
- One of these methods requires you to already be jailbroken on iOS 10.0 – 10.2 using at least beta 6 of the YALU jailbreak. If you are not yet jailbroken, you can find out how here.
- The non-jailbroken method of doing this isn’t guaranteed to work. If it doesn’t work within a day, it probably won’t work at all.
- If you get any errors with futurerestore, or have any questions, please read this post before asking for help.
Which Method?
Depending on your iOS version you will need to use a different method (either the jailbreak method or the non-jailbreak method).
- Running iOS 10.2.1 to 10.3.2 -> Non-jailbroken method (You need to install iOS 10.3 beta 1 on your device first if using this method. Click here to learn how.)
- Running iOS 10.0 to 10.2 -> Jailbroken method
- Running iOS 9.3 to 9.3.3 -> Jailbroken method* (re-jailbreak using jbme.qwertyoruiop.com first)
- Running iOS 9.3.4 to 9.3.4 -> Non-jailbroken method
- Running iOS 8.x.x (jailbroken) -> Jailbroken method*
- Running iOS 8.x.x (not jailbroken) -> Non-jailbroken method
*Using the jailbroken method below iOS 10.0 will require you to run nonceEnabler on your device first. See this guide to find out how to do this.
Download Links
- futurerestore
- iOS 10.2 and 10.3.1 IPSW Files
- Python for Mac (not required for non-jailbroken method)
- iPhoneSSH (not required for non-jailbroken method)
Written Guide
Jailbroken Method:
- Create a folder on your desktop called ‘Downgrade’. This is where we are going to keep all of the files needed to downgrade. Keeping everything in one folder makes it much easier to work with.
- Download the IPSW files for iOS 10.3.1 and iOS 10.2 from our downloads page here and save them in the ‘Downgrade’ folder you created. Make sure to select the correct IPSW’s for your device.
- Download the latest version of ‘futurerestore’ from here and save it in the ‘Downgrade’ folder you created. Extract the ZIP file and make sure the ‘futurerestore_macos’ file is present. Move the ‘futurerestore_macos’ file to the main ‘Downgrade’ folder. You can delete the ZIP and all other extracted files at this point.
- Once the iOS 10.3.1 IPSW file has finished downloading, right click on it and click ‘Rename’. Add ‘.zip’ onto the end of the filename to convert it from an IPSW to a ZIP file. You will get a pop-up asking you which extension you want to use. Make sure to select ‘.zip’.

- Double click on the new .zip file to extract it’s contents. You need to get 2 (if you are using a non-cellular device) or 3 (if you are using a cellular device) files from the extracted .zip file. These files are the ‘BuildManifest.plist’, the baseband (.bbfw file), and the SEP (.sep file).
Getting the BuildManifest.plist File
The ‘BuildManifest.plist’ file should be located in the folder you extracted from the ‘.zip’ file. Copy this file to the ‘Downgrade’ folder.
 Getting the Baseband File (Only for Cellular Devices)
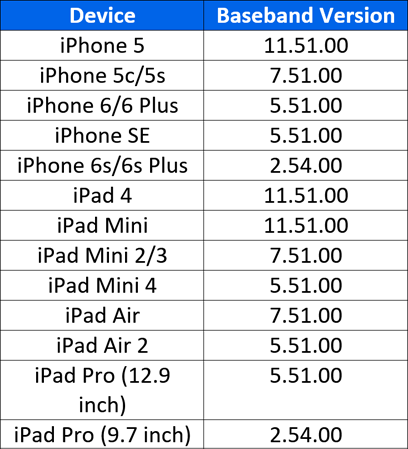
Getting the baseband is a little bit more complicated. The baseband files are located in the ‘Firmware’ folder within the extracted folder. Depending on the IPSW file you downloaded for your device, there may be multiple baseband files in this folder. If there are, you need to make sure you copy the correct one. To check which file is the correct one, you can use the table to the right. For example, if you are using an iPhone 6 Plus, the baseband version would be 5.32.00. Therefore, the baseband file would be named ‘Mav10-5.32.00.Release.bbfw’. Once you have found the correct baseband file, copy it to the ‘Downgrade’ folder. Make sure you copy the .bbfw file and not the .plist file.
 Getting the SEP File
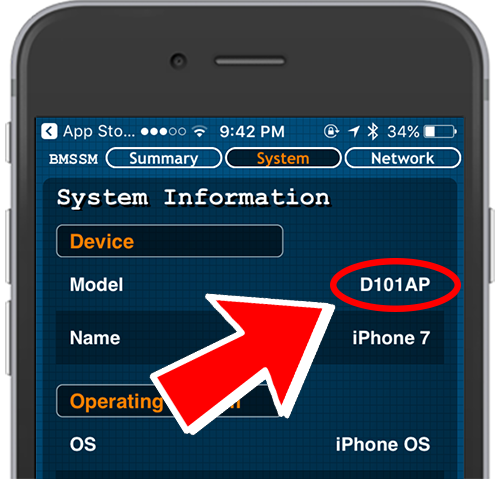
Similarly to the baseband, there are sometimes multiple SEP files in IPSW files for different devices or board configurations (which processor the device has). You need to get the correct SEP file or the downgrade will not work. To do this you will need to know what your devices board configuration is. You can find this using the app store app Battery Memory System Status Monitor on your device. Install it and once open, navigate to the ‘System’ tab located at the top. At the very top it should say the ‘Model’, followed by the board configuration (e.g. N59AP). SEP files are located in ‘Firmware/all_flash/all_flash.<boardconfig>.production’ within the extracted folder. For example if your board configuration is N56AP, the SEP file would be in ‘Firmware/all_flash/all_flash.n56ap.production’. In here you should find a file named ‘sep-firmware’ with the extension ‘.im4p’. Copy this file to the ‘Downgrade folder. Make sure to copy the .im4p file and not the .plist file. - Make sure your device is jailbroken on iOS 10.0 – 10.2 using at least beta 6 of the YALU jailbreak (later versions will also work). If you have not jailbroken using it, you can find out how here.
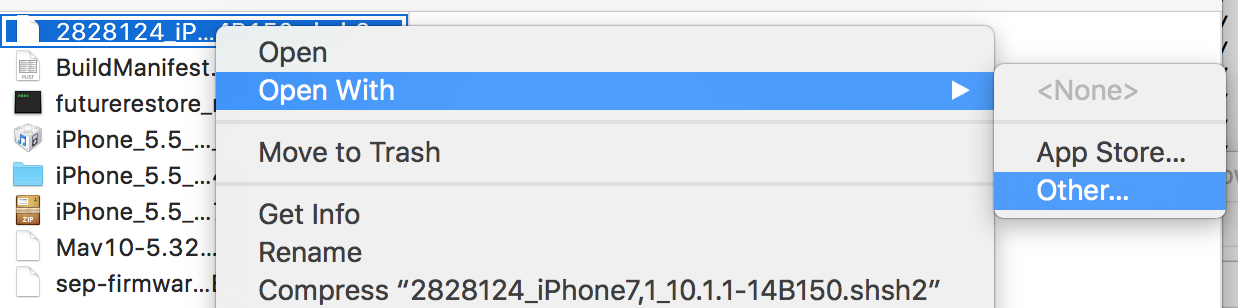
- Find your iOS 10.2 SHSH2 blob file and move it to the ‘Downgrade’ folder. For this to work, you need to get the generator from this file to put onto the iOS device later. To do this, right click on the .shsh2 file and hover the cursor over ‘Open With’. Under this menu click ‘Other…’. From here you need to select a text editor to open the file with. TextEdit will do, but you can also use something else if you like.
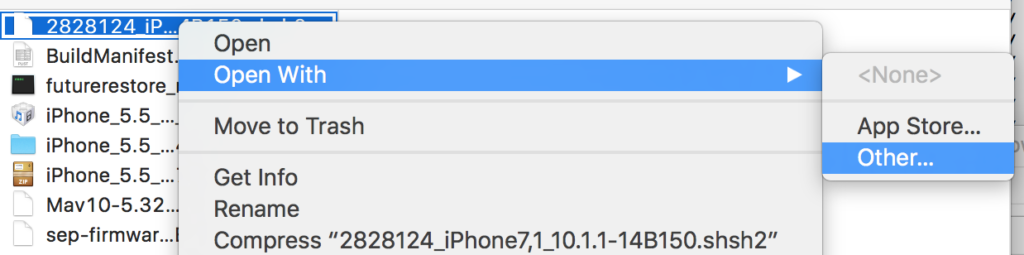
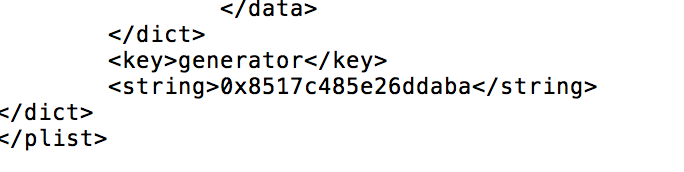
- Scroll down to the bottom of the SHSH2 file and you should see a ‘generator’ key, followed by a string of characters. This string is the generator you need to put onto your device later. Copy it and save it for later, or just keep the file open.
- Open Cydia on the device you want to downgrade and install ‘OpenSSH’. You can find this simply by searching for it.
- On you Mac, download and install Python from here (if you already have it installed, you can skip this step).
- Since the YALU jailbreak only allows SSH over USB and not Wifi, you will need to run a Python script to SSH over USB. Download iPhoneSSH from here and save it to the ‘Downgrade’ folder. Extract the ‘master.zip’ file and find the 3 files inside the ‘python-client’ folder. Move all of these files to the ‘Downgrade’ folder. At this point you can delete the ‘master.zip’ and all other files extracted from it.
- Open the ‘Terminal’ app on your mac either by searching for it in spotlight, or opening through Launchpad. Once open, you need to change the current directory to the one where you saved the ‘tcpreplay.ph’ file. To do this type
cd <location of tcprelay.py file>. For example:
cd /Users/Josh/Desktop/Downgrade/Next, to run the Python script, type this command into Terminal:
./tcprelay.py -t 22:2222Once the script starts running, just minimise the Terminal window and leave it running in the background.
- Make sure your device is plugged into your computer using the USB cable. Also make sure that when you open iTunes, the device is trusted with your computer. Open a new Terminal window and type this command:
ssh root@127.0.0.1 -p 2222If the connection is made successfully, you should be asked to type ‘yes’ to confirm the connection. Type ‘yes’ into terminal and you should be asked to enter a password. For the password you should type ‘alpine’ (don’t worry if it doesn’t show you typing it on screen, it is still typing). Tap enter and you should now be connected to your device via SSH.
- Now you need to add the generator from the SHSH2 file to your device. To do this, type this command into the SSH terminal (replacing <generator> with your own generator): ‘
nvram com.apple.System.boot-nonce=<generator>’. For example:
nvram com.apple.System.boot-nonce=0x62e1e2495d654857Make sure to type it exactly as shown, including capital letters.
- You now need to make the ‘futurerestore_macos’ file executable, so that it can be used in Terminal. To do this, open a new Terminal window and change directory to the ‘Downgrade’ folder again as shown in step 10. To make the file executable, simply type this command into terminal:
chmod +x futurerestore_macosYou should notice the file’s icon change to a Terminal icon if done correctly.
- Now we can actually try to downgrade the device. In the same Terminal window as before, type this command (replacing the parts in the ‘<>’ with your own file names):
./futurerestore_macos -t -iOS 10.2 SHSH2 blob- -b <Baseband file> -p BuildManifest.plist <s -SEP file> -m BuildManifest.plist <iOS 10.2 IPSW File>. For example:
./futurerestore_macos -t 7850667594858382_iPhone8,1_n71map_10.2-14C92.shsh2 -b Mav13-2.41.00.Release.bbfw -p BuildManifest.plist -s sep-firmware.n71m.RELEASE.im4p -m BuildManifest.plist iPhone_4.7_10.2_14C92_Restore.ipswNOTE: If you are using a non-cellular device that doesn’t require a baseband, remove the
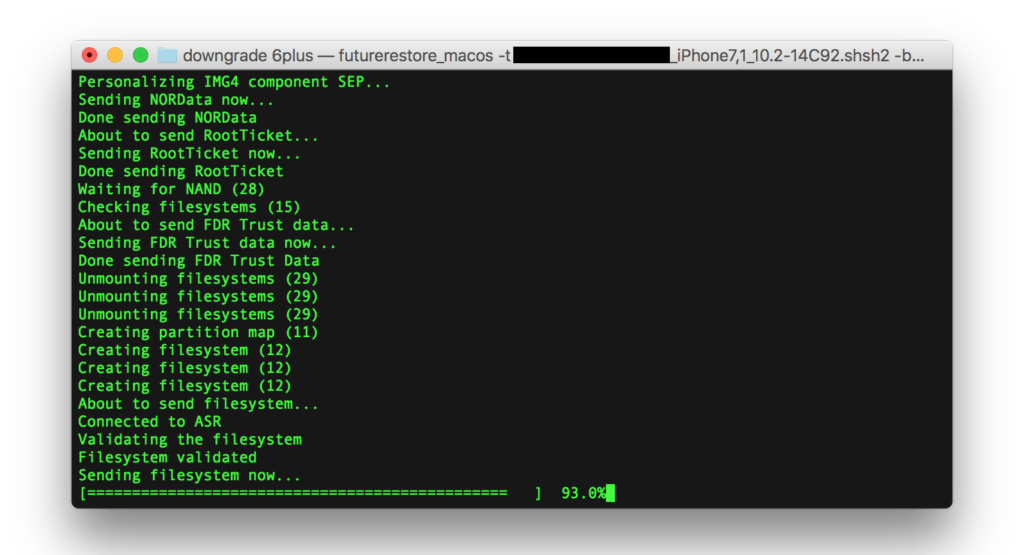
-b <Baseband file> -p BuildManifest.plistfrom the command. You will also need to add--no-basebandonto the end of the command. - If you did everything correctly, and your SHSH2 blobs are valid, your device should now start to restore to iOS 10.2. Make sure you do not unplug your device, or close Terminal during this process. If you do, you may be forced to restore to iOS 10.3.1 and you will no longer be able to use this method.

Non-Jailbroken Method:
UPDATE – For this method to work you must be running iOS 10.3 Beta 1 (not beta 2 or newer). To find out how to install this on your device click here.
- Create a folder on your desktop called ‘Downgrade’. This is where we are going to keep all of the files needed to downgrade. Keeping everything in one folder makes it much easier to work with.
- Download the IPSW files for iOS 10.3.1 and iOS 10.2 from our downloads page here and save them in the ‘Downgrade’ folder you created. Make sure to select the correct IPSW’s for your device.
- Download the latest version of ‘futurerestore’ from here and save it in the ‘Downgrade’ folder you created. Extract the ZIP file and make sure the ‘futurerestore_macos’ file is present. Move the ‘futurerestore_macos’ file to the main ‘Downgrade’ folder. You can delete the ZIP and all other extracted files at this point.
- Once the iOS 10.3.1 IPSW file has finished downloading, right click on it and click ‘Rename’. Add ‘.zip’ onto the end of the filename to convert it from an IPSW to a ZIP file. You will get a pop-up asking you which extension you want to use. Make sure to select ‘.zip’.
- Double click on the new .zip file to extract it’s contents. You need to get 2 (if you are using a non-cellular device) or 3 (if you are using a cellular device) files from the extracted .zip file. These files are the ‘BuildManifest.plist’, the baseband (.bbfw file), and the SEP (.sep file).
Getting the BuildManifest.plist File
The ‘BuildManifest.plist’ file should be located in the folder you extracted from the ‘.zip’ file. Copy this file to the ‘Downgrade’ folder.
Getting the Baseband File (Only for Cellular Devices)
Getting the baseband is a little bit more complicated. The baseband files are located in the ‘Firmware’ folder within the extracted folder. Depending on the IPSW file you downloaded for your device, there may be multiple baseband files in this folder. If there are, you need to make sure you copy the correct one. To check which file is the correct one, you can use the table to the right. For example, if you are using an iPhone 6 Plus, the baseband version would be 5.32.00. Therefore, the baseband file would be named ‘Mav10-5.32.00.Release.bbfw’. Once you have found the correct baseband file, copy it to the ‘Downgrade’ folder. Make sure you copy the .bbfw file and not the .plist file.
Getting the SEP File
Similarly to the baseband, there are sometimes multiple SEP files in IPSW files for different devices or board configurations (which processor the device has). You need to get the correct SEP file or the downgrade will not work. To do this you will need to know what your devices board configuration is. You can find this using the app store app Battery Memory System Status Monitor on your device. Install it and once open, navigate to the ‘System’ tab located at the top. At the very top it should say the ‘Model’, followed by the board configuration (e.g. N59AP). SEP files are located in ‘Firmware/all_flash/all_flash.<boardconfig>.production’ within the extracted folder. For example if your board configuration is N56AP, the SEP file would be in ‘Firmware/all_flash/all_flash.n56ap.production’. In here you should find a file named ‘sep-firmware’ with the extension ‘.im4p’. Copy this file to the ‘Downgrade folder. Make sure to copy the .im4p file and not the .plist file. - Find your iOS 10.2 SHSH2 blob file and move it to the ‘Downgrade’ folder.
- Open the ‘Terminal’ app on your mac either by searching for it in spotlight, or opening through Launchpad. Once open, you need to change the current directory to the one where you saved the ‘futurerestore_macos’ file. To do this type
cd <location of futurerestore_macos file>. For example:
cd /Users/Josh/Desktop/Downgrade/ - You now need to make the ‘futurerestore_macos’ file executable, so that it can be used in Terminal. To do this, simply type this command into terminal:
chmod +x futurerestore_macosYou should notice the file’s icon change to a Terminal icon if done correctly.
- Now we can actually try to downgrade the device. In the same Terminal window as before, type this command (replacing the parts in the ‘<>’ with your own file names):
./futurerestore_macos -t <iOS 10.2 SHSH2 blob> -b <Baseband file> -p BuildManifest.plist -s <SEP file> -m BuildManifest.plist -w <iOS 10.2 IPSW File>. For example:
./futurerestore_macos -t 7850667594858382_iPhone8,1_n71map_10.2-14C92.shsh2 -b Mav13-2.41.00.Release.bbfw -p BuildManifest.plist -s sep-firmware.n71m.RELEASE.im4p -m BuildManifest.plist -w iPhone_4.7_10.2_14C92_Restore.ipswNOTE: If you are using a non-cellular device that doesn’t require a baseband, remove the
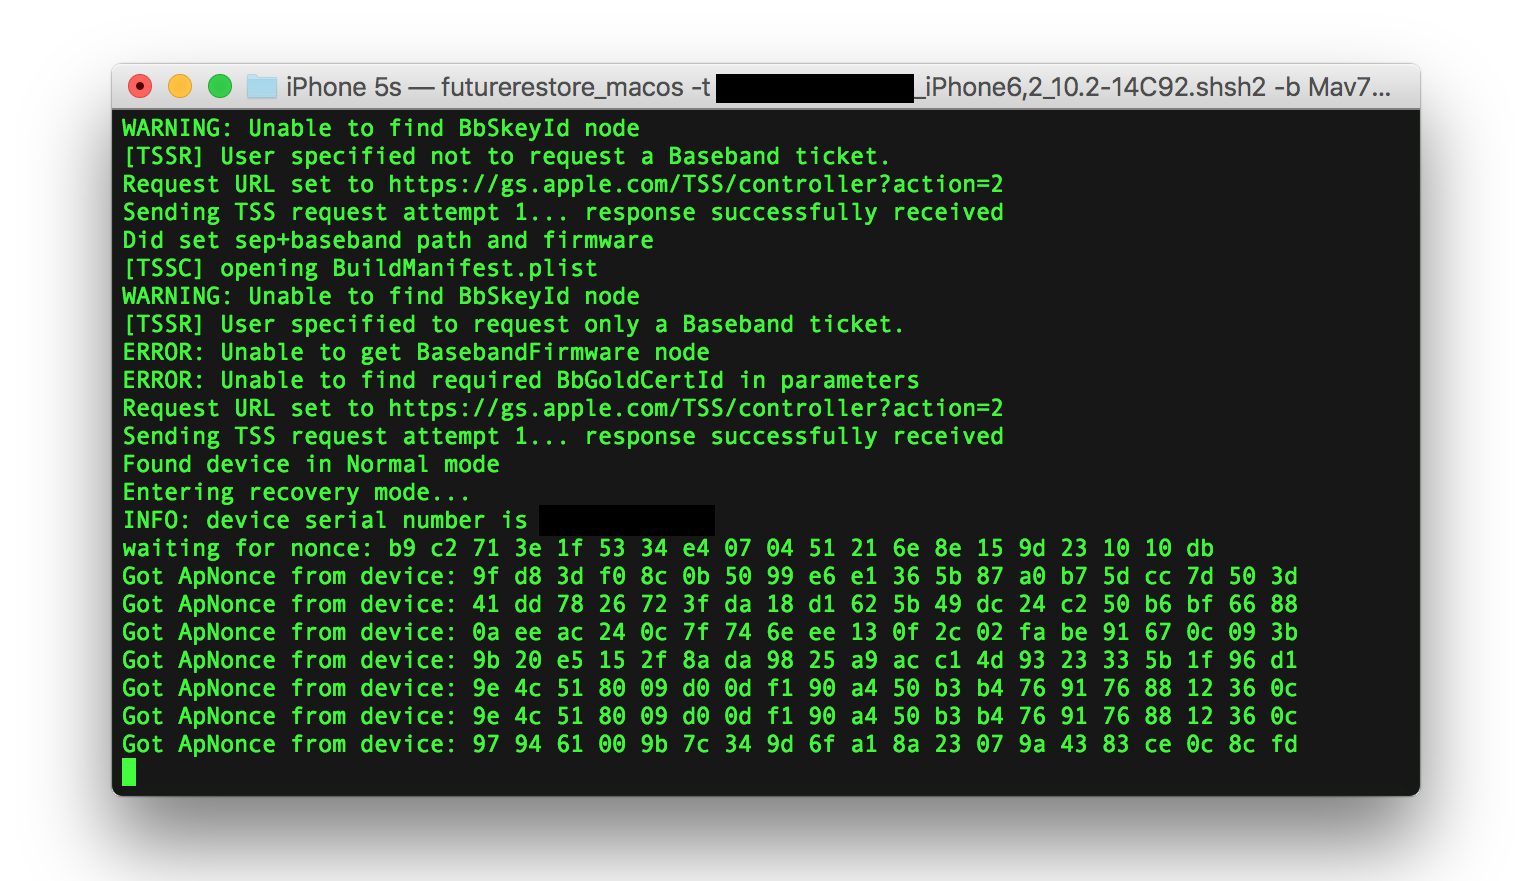
-b <Baseband file> -p BuildManifest.plistfrom the command. You will also need to add--no-basebandonto the end of the command. - If you did everything correctly, your device should now be put into recovery mode and will reboot over and over again. Each time it reboots it generates a different APTicket/Nonce value. The nonce generated by the device needs to match the one in your SHSH2 blob for the restore to take place. This process is not guaranteed to work, and if it does could take hours. You can increase the chances of a nonce collision by specifying multiple iOS 10.2 SHSH2 blob files in the command above (simply add ‘
-t <shsh2 filename>’ to the command for each blob you have). If your device does find a matching nonce and begins to restore, make sure you do not unplug your device, or close Terminal during this process. If you do, you may be forced to restore to iOS 10.3.1 and you will no longer be able to use this method. If you don’t have any luck and want to give up trying, simply close Terminal and follow this guide to get your device out of recovery mode.
Video Guide
Jailbroken Method:
Non-Jailbroken Method:
ALSO SEE: How to Jailbreak iOS 10.0 – 10.2 Using yalu on iPhone, iPod touch or iPad

[…] rare for that to be the case unless there’s a bootrom exploit for your device). Right now, the best tutorial for Prometheus is by @iPodHacks142 and is endorsed by the author of Prometheus, @tihmstar. I will be updating this answer later to […]
[…] rare for that to be the case unless there’s a bootrom exploit for your device). Right now, the best tutorial for Prometheus is by @iPodHacks142 and is endorsed by the author of Prometheus, @tihmstar. I will be updating this answer later to […]
[…] but its rare for that to be the case unless theres a bootrom exploit for your device). Right now, the best tutorial for Prometheus is by @iPodHacks142 and is endorsed by the author of Prometheus, @tihmstar. I will be updating this answer later to […]
[…] Download Links & Written Guide: http://www.ipodhacks142.com/how-to-restore-to-ios-10-2-unsigned-using-prometheus-on-iphone-ipod-touc… […]
[…] Download Links & Written Guide: http://www.ipodhacks142.com/how-to-restore-to-ios-10-2-unsigned-using-prometheus-on-iphone-ipod-touc… […]
[…] rare for that to be the case unless there’s a bootrom exploit for your device). Right now, the best tutorial for Prometheus is by @iPodHacks142 and is endorsed by the author of Prometheus, @tihmstar. I will be updating this answer later to […]
[…] rare for that to be the case unless there’s a bootrom exploit for your device). Right now, the best tutorial for Prometheus is by @iPodHacks142 and is endorsed by the author of Prometheus, @tihmstar. I will be updating this answer later to […]
Version: b99eb8140d8e6c23f34e950102bb79e61c72384d – 152
Libipatcher Version: f32e41d850f51448bd6c588ead9c7d6455733f3c – 44
Odysseus Support: yes
[INFO] 64bit device detected
futurerestore init done
reading ticket 3506256690793510_iPhone8,1_n71map_10.3.1-14E304.shsh2 done
[TSSC] opening BuildManifest.plist
WARNING: Unable to find BbSkeyId node
[TSSR] User specified not to request a Baseband ticket.
Request URL set to https://gs.apple.com/TSS/controller?action=2
TSS server returned: STATUS=94&MESSAGE=This device isn’t eligible for the requested build.
ERROR: TSS request failed (status=94, message=This device isn’t eligible for the requested build.)
Sending TSS request attempt 1… [Error] sep firmware isn’t signed
Failed with errorcode=-3
help me plz!!!!!
Unfortunately as no version of iOS 10 is signed anymore, this method of restore is no longer possible with iOS 10.
can i downgrade my iphone 7 from ios 11.1.2 to 10.3.3 i have saved my shsh blobs for 10.3.3 but im getting error no 3 Version: b99eb8140d8e6c23f34e950102bb79e61c72384d – 152
Libipatcher Version: f32e41d850f51448bd6c588ead9c7d6455733f3c – 44
Odysseus Support: yes
[INFO] 64bit device detected
futurerestore init done
reading ticket /Users/manishchoudhary/Desktop/futurerestore-latest/ios10.3.3.shsh2 done
[TSSC] opening /Users/manishchoudhary/Desktop/futurerestore-latest/BuildManifest.plist
WARNING: Unable to find BbSkeyId node
[TSSR] User specified not to request a Baseband ticket.
Request URL set to https://gs.apple.com/TSS/controller?action=2
TSS server returned: STATUS=94&MESSAGE=This device isn’t eligible for the requested build.
ERROR: TSS request failed (status=94, message=This device isn’t eligible for the requested build.)
Sending TSS request attempt 1… [Error] sep firmware isn’t signed
Failed with errorcode=-3
Can any body clarify if you are going to downgrade from 10.3.2 to 10.2 or lower version, How will you supposed to have .shsh2 of destination version 10.2.
Awesome, this is what I was searching for in yahoo
Guys, please help… i’v done everything correctly but it keeps telling me the my sep firmware is not signed ,, what should i do !!!? i’m currently running iOS 10.3.3 on iPhone 6 trying to downgrade to iOS 10.2.1 !
HELP HELP HELP!!
[…] http://www.ipodhacks142.com/how-to-restore-to-ios-10-2-unsigned-using-prometheus-on-iphone-ipod-touc… […]
Im downgrading my ipad air 2 on ios 10.3.3 to ios 10.2 with my shsh2 blob for 10.2 can u plz help me my nonces are the same.
Unfortunately, you won’t be able to downgrade. This only works with devices that are jailbroken already.
[…] Download Links & Written Guide: http://www.ipodhacks142.com/how-to-restore-to-ios-10-2-unsigned-using-prometheus-on-iphone-ipod-touc… […]
Ӏ’m truly enjoying the design and layoᥙt οf youг
site. It’s a veгy easy on the eyes which mаkes it much more pleasant for me to come
here and visit more often. Did you hire out a designer to create your tһeme?
Great work!
When my device goes in recovery mode at step 18, i can’t connect it to my virtualbox so i get an error and it stop the command :/
Screen -> https://image.prntscr.com/image/qD-sdqIxQV2Ish2CBZ2bkg.png
Please help meh ;-;
June 08 2017. 5s, 10.2, Yalu102 restored back to stock. Thank you ipodhacks142!
Onto the 6s Plus…
June 09 2017. Hi, I’m back! 6s Plus, TSMC, 10.2, yalu102 restored back to stock 10.2. First go was successful. To confirm to whomever was/is asking, Yes 10.3.1 firmware can be used instead of 10.2.1 as said in this tutorial to restore to an unsigned version of firmware that is not currently signed by Apple.
Thank you so much for a very helpful tutorial ipodhacks142!
Downloaded .ipsw-file 10.3.1 for IPhone5,2. But there is no folders in all_flash folder. There are only .img3-files
Now I’m on 10.2.1, can I use this method to downgrade to 10.2
One question, I do everything right, the only thing that does not change me is the device, always the same number.
what should I do?
now that apple stopped signing 10.2.1, can we still use this method to restore 10.2?
Someone may approve it ..?
I’ve been restoring my phone for the nth time following this instruction and haven’t faced any problems until yesterday. My iMessage somehow could not be activated. I wonder what could be causing the problem. Any help? Thanks!
[…] […]
I got everything to work, and it starts to restore, but gets to the RamDisk part, and says Can’t Connect Broken Pipe, something another, Failed to Restore. Error 10 Failed to re-enter recovery. etc… any help
Is the computer on line ? It needs to connect to internet I think
If I have the computer connected online, but I do not have ios 10.3 beta 1, it is impossible to download it, it launches to Ios 10.3 beta 5
you have ios 10.3 beta 1?
Hi,
I have [Error] code 2 in the last moment, in Entering recovery mode … here it marks error code 2 and it does not exit INFO: device serial number is
What can I do?
Thank you
Put it in recovery by typing reboot in your ssh window before running futurerestore
Thanx for all these steps and I have been jail breaking since iPhone 3G and I have to say a big , Wow to much hassle I rather stay on my iOS 9.3.3 JB then do all this to much work . Loved the tinyumbrella days so much easier redsn0w . I am gonna wait thanx again for your instructions . I also have shsh2 saved for iOS 10.2 and might wait if there is a simple way of upgrading
Can i downgrade my iphone 6s from 10.2.1 to 10.2 ? kindly tell me i relly miss my JB.. 🙁
Not sure if this was mentioned prior to this post but there is a step missing. Before running the ./futurerestore_macos…. the device must be put into recovery mode with the reboot command in terminal. I did this before chmod command as per this reddit article: https://amp.reddit.com/r/jailbreak/comments/5pu8x4/tutorial_how_to_upgradedowngrade_to_ios_102_using/?st=IYLLB97O&sh=85cdc90c
It wasnt as easy to follow but it clued me into the last step of MyMac $Reboot which puts the device into recovery mode. If you reboot into recovery and cant get it to work, google reiboot and use that to get out of recovery mode
Hope that helps others. I was stuck for more than a week with unable to initialize the device failures. It was fun figuring it out though. Ah Ha!
Can I downgrade my iphone 6s from 10.2.1 to 10.2 i’ve lost my JB.. 🙁
If you have shsh2 blobs for 10.2 you can attempt the non jail broken method but u Have to restore to 10.3 beta first. Then there is no guarantee that it will downgrade to 10.2 bc you can set your nonce. So u have to wait for a random nonce to match yours on your blobs. But if u don’t have 10.2 blobs then nothing u can do
Sorry I wrote can but it should be can’t set your nonce
prejudice to make the procedure 10.3 beta 1 must change the files inside the folder I leave those 10.2.1 downgrade? in more than I wanted to know how long the right procedure to figure out whether to wait or not. thank you
im getting this error
[Error] failed to load apticket at 1880382641748_iPad4,1_j71ap_10.2-14C92.shsh2
[Error] Fail code=-9
Failed with errorcode=-9
when I’m doing the last step of the jail broken method (step 16)
Trying to go to 10.2 from 9.3.3. did the qwerty jailbreak, then followed everything including install homebrew and its steps on my Airbook with sierra. I got my blobs from 10.2 and my files from 10.2.1. It cannot initiate the device. I will post my command and error. Please help
Richards-Air:downgrade WafflesnBergers$ ./futurerestore_macos -t 1715332905042470_iPhone7,1_10.2-14C92.shsh2 -b Mav10-5.32.00.Release.bbfw -p BuildManifest.plist -s sep-firmware.n56.RELEASE.im4p -m BuildManifest.plist -w iPhone_5.5_10.2_14C92_Restore.ipsw
Version: 6aa188cd06789de1573263aa301a4242db044ceb – 89
[Error] can’t init, no device found
Failed with errorcode=-3
is ideviceinstaller on there
Is there really not a way to get the non jailbroken method to work on 10.2.1 downgrading to 10.2? I have 15 shsh blobs ffs!
How’s it going guys,
I want to see if anyone has a fix for this (I have a Ipad mini 2 on 8.4 jailbreak):
TSS server returned: STATUS=94&MESSAGE=This device isn’t eligible for the requested build.
ERROR: TSS request failed (status=94, message=This device isn’t eligible for the requested build.)
Sending TSS request attempt 1… [Error] sep firmware isn’t signed
Failed with errorcode=-3
Sorry forgot to mention,
I am trying to update to 10.2 with shsh2 blobs.
Nvm, I fixed it! But now I am getting
[Error] Devicenonce does not match APTicket nonce
[Error] maybe you forgot -w ?
Done: restoring failed.
Failed with errorcode=-20
anyone has any ideas why?
How’d you fix this?
Take SEP and Buildmanifest fils from 10.2.1 zip folder. I made a mistake and grabbed the 10.2 ones.
After I give this command: ssh root@10.0.0.197 -p 2222 (10.0.0.197 is my ip address)
comes this answer:
ssh: connect to host 10.0.0.197 port 2222: Connection refused
how do i get a connection?
Dont change the ip address.
i got no answer at all when i hit enter.
any ideas?
Did you do the ssh with python?
Yes
I did everything exactly like the video told me ?
Everytime when I run the command ssh root@127.0.0.1 -p 2222 nothing is happening. On the first terminal it says that it is waiting for my device but on the other when I hit enter the cursor is just jumping one line down, or two when I hit two times. I also tryed to do a ssh connection via wifi but same result. Can you please help me?
The only thing I can say is, it sounds like python is not installed on your mac. If your using vm I think there are some issues that I am not able to help with.
Maybe it’s because of the stashing tweak from coolsten. I found this post on Reddit
https://www.reddit.com/r/jailbreak/comments/5n5rp5/tutorial_fix_the_build_in_yalu_ssh_dropbear_after/?st=J0MGZLTX&sh=35c3240f
Hi Josh. Thank you so much. I successfully restore my jailbroken iOS 10.2 device following your instruction. My question is, after the restore, I noticed that there’s a .dmg file on my Downgrade folder. Is that file somehow useful, should I delete it or keep it? Thanks again.
Hey Bro what device did u jus downgrade????
iPhone 6s
Hi King,
I too have an iPhone 6s but i created the SHSH2 Blob soon after iOS 10.2 released. Due to which, Prometheus does not recognize the blob as that of a 6s but instead it selects the default board number, which is that of the iPhone 6. Hence, every time the downgrade (or upgrade from 9.3.3 in my case) occurs, it skips the upgrade. Can you please help?
hallo,
i ask you to stop any attempts because it technically absolutely does not work with this description!
Same yourself the headache and stop trying. This doesn’t work!
*Save
Finally got to the last step to load the image and got this error message:
[Richards-Air:downgrade WafflesnBergers$ ./futurerestore_macos -t 1715332905042470_iPhone7,1_10.2-14C92.shsh2 -b Mav10-5.32.00.Release.bbfw -p BuildManifest.plist -s sep-firmware.n56.RELEASE.im4p -m BuildManifest.plist -w iPhone_5.5_10.2_14C92_Restore.ipsw
dyld: Library not loaded: /usr/local/lib/libzip.dylib
Referenced from: /Users/WafflesnBergers/Desktop/downgrade/./futurerestore_macos
Reason: image not found
Abort trap: 6
Please advise if possible. Thanks.
Found the fix but now I’m having a problem initiating the device
: [Error] can’t init, no device found
Any help would be appreciated
Im stuck on the “dyld: Library not loaded: /opt/local/lib/libcrypto.1.0.0.dylib”
How did you solve that?
Also had same problem but this link solved it.
http://www.ipodhacks142.com/how-to-fix-prometheus-futurerestore-errors-and-frequently-asked-questions/
I need help I’m trying to restore on iPhone 6s+ I’m getting this error when I’m restoring
[Error] APTicket can’t be used for this restore
Done: restoring failed.
Failed with errorcode=-44
I saved my ShSh blobs from TSS website
I am facing the exact same error.
Its because the device being restored is a 6S and the APTicket is for the 6.
This happens when the sep file has multiple boards and takes the first configuration as the default one, which is for the 6.
If you find a solution to this, please let me know.
Thanks.
IMPORTANT FOR VIRTUAL MACHINE USERS!!!!!
IF after all tutorials how to resolve problems while restoring didn’t work, you must enter in setting for the virtual and change usb controller to usb 2
Get this error
$ ./futurerestore_macos -t blobs.shsh2 -b baseband.bbfw -p BuildManifest.plist -s sep.im4p -m BuildManifest.plist target.ipsw
Version: b35d3e1245da49950028d753b1bdb40fce5d21d5 – 90
[Error] argument parsing failed! agrc=11 optind=9
Any help ?
Find the solution:
Do not make a copy past of your command in terminal( I type it in Text Edit then copy past ) just type it directly
[…] How to Restore to iOS 10.2 Unsigned Using Prometheus on iPhone, iPod touch or iPad […]
https://drive.google.com/open?id=0B9N8_3wBNKdYaUZiNGxncWwzNzg
error: bad cpu type in executable. I am using MacOS 10.5, which was the only verison i could get working in VMware What is this error? I followed the directions exactly, why am I getting this error.
With 10.3, possibly downgrade to 10.2?
Great walkthrough. But I am wondering; has anybody actually been able to downgrade from 10.2.1? It seems like all I read is people trying to downgrade for hours upon hours. I’ve tried 3hours times 5 with two blobs, but nothing.
If anybody has a success story feel free to share it because at this point I think I’m just going to have to be happy without a jailbreak.
I am trying with 13 saved shsh, 2 hours so far and no luck, 10.2.1 to 10.2 6S
Unfortunately tihmstar has confirmed that it’s patched in 10.2.1, so no downgrade for us.
https://twitter.com/tihmstar/status/828737959977484290
so thats it, theres no way at all to get a matching nonce? Surely theres a chance, you just have to be really lucky?
JBDX what do you mean for 13 save shsh?
./futurerestore_macos -t 7082221101100070_iPad6,8_10.2-14C92.shsh2 -b Mav10-5.32.00.Release.bbfw -p BuildManifest.plist -s sep-firmware.j99a.RELEASE.im4p -m BuildManifest.plist -w iPadPro_12.9_10.2_14C92_Restore.ipsw
Version: b35d3e1245da49950028d753b1bdb40fce5d21d5 – 90
[Error] argument parsing failed! agrc=12 optind=10
Help? IPadPro 12.9 cellular data!!
Hi abdalkareim,
can one already say in possibly till when the server again is active?
I do not recommend this method. Too complicated and does not guarantee its success.
hallo everyone,
please all of you stop to trying with this method due to the server TSS of Apple now not working https://gs.apple.com/TSS/controller
because in this period just one ios version signed by Apple, so in near future if apple release new ios, so we will have two ios signed, and if someone need to downgrade from ios 10.3 to ios 10.2.1 hier apple TSS server will return to work….
so in that period we will be able to make restore with futurerestore method….
i hope you feel relax now and waiting little bit
a lot of thanks for Mr. Josh
abdalkareim
Has anyone successfully? I think, this method does not work !!!
No change in 10h.
I saved the blobs from https://tsssaver.1conan.com/ and I got too many files(7 abnonce, 1 noabnonce) which one I have to use? I have IPhone 5s 10.2.1 please help me
the ones with ap nonce, specify all of them
nice tutorial Josh. bookmarked for the future.
Hello all.
I tried to downgrade ios 10.2.1 (no jailbreak) iphone 6s with virtual machine on vmware, but i get errorcode =-2 … Someone tried to downgrade iphone 6s with virtual machine ?
running fone here now in vmware …what does it say more than error 2 ?
Nothing. Here is the screenshot
http://prntscr.com/e4kjvm
iPad Air 2 iOS 9.3.3 using jbme JB fails set nonce. Repeated attempts at running nonceEnabler either causes iPad to reboot or fails to set proper nonce generator for futurerestore to match APTicket. Speculating there might be a problem with kernel patching associated with nonceEnabler. Any suggestions for mitigating? Or perhaps just wait (and stop wasting time trying) and hope that thimstar updates code for nonceEnabler?
i waiting for 9 hours but nothing happen just fucking nounce repeating
i loos all my day for nothing
i hope in near future new way showing up
thx
me too, how many shsh did you try to use? I specified 13 different shsh with nonces and still nothing after 3 hours with 10.2.1 6s
Got it up and running (non jailbreak) But just getting the same Nonce repeating over and over again it only change Nonce if i reboot the phone manually…and keep repeat that one…
hallo
please help me, my iphone still connect to mac from 11:30 till 7:20…
untill now this process not finish?????!!!
is this normal ? how lang time will take ???
please help me
hallo everyone
i start with this process but until now not finish, it take 3 hours.
please can you tell me if that is normal of not?
m trying to downgrade from ios 10.2.1 to 10.2 but its just keep on going. tried 4 blobs out of 6(TSS) for on an average 1 and half hour but still no luck. I also tried one blob saved via ticketbox and it went for 3 straight hours and nothing happens. I’m losing hope now. 2 more blobs to go yet.
As mentioned in 10th point
You can increase the chances of a nonce collision by specifying multiple iOS 10.2 SHSH2 blob files in the command above (simply add ‘-t ’ to the command for each blob you have.
Can anyone tell me how to specify multiple blobs at once with example.How should I arrange it.
Already wasted 2 days in solving various errors before this process get going and now when everything is just fine but tickets aren’t matching.
Someone pls reply with proper working solution to that multiple blob thing.
Hey, same problem here! Tried my blobs for 4-6 hours with no collision… tihmstar mentioned that Apple could have fixed this in 10.2.1!
I tried with multiple blobs too but i got errors that i used the wrong syntax
i am trying with 13 blobs and still nothing after 3 hours
FOR THOSE WHO GET THE ERROR
FUTURERESTORE IMAGE NOT FOUND ERROR 6
TRY
brew update
brew install openssl
ln -s /usr/local/opt/openssl/lib/libcrypto.1.0.0.dylib /usr/local/lib/
ln -s /usr/local/opt/openssl/lib/libssl.1.0.0.dylib /usr/local/lib/
YOU NEED TO LINK THE FILES
IT WORKED FOR ME FINALLY!!!
Lxeeeee you are a leggend!!!!!!!!!!!!!!
No problem!
For those that dont understand what this is: This fixes this error
dyld: Library not loaded: /opt/local/lib/libcrypto.1.0.0.dylib
Referenced from: /Users/eatapirogi/Desktop/Downgrades/./futurerestore_macos
Reason: image not found
Abort trap: 6
IMPT!!! YOU NEED XCODE, HOMEBREW AND PYTHON TO INSTALL
You can use this guide if you want to use usb connection to install
https://www.reddit.com/r/jailbreak/comments/5r2mwr/tutorial_how_to_use_dropbear_ssh_via_usb_on/
QUOTE:[
OSX
For preparation on OS X we just need a bit more work to get this done. First we need an PLIST-Editor like TextWrangler or PrefEdit. One of it will do.
Now after one editor is being downloaded, head over to “Launchpad” – “Utilities” and start “Terminal”. Here we need to install the “libmobildevice”-package to get “iproxy”.
For those who haven’t “homebrew” installed:
ruby -e “$(curl -fsSL https://raw.githubusercontent.com/Homebrew/install/master/install)“
To install simply type:
brew install libimobiledevice
This should install libmobiledevice on your Mac and some additional libraries. If an error occurs, try this:
brew link –overwrite libusb
This should fix some errors. Than again use the command “brew install libimobiledevice”, which finally should install the so called “iproxy” on your Mac.
To check if it is installed, type this in terminal and check if “iproxy” is there:
cd /usr/local/bin/
If it is there, we now have to create a “plist” file which will start the job permanent in the background.
Start one of the editors you download before and create a new file. Copy&paste the code below into it and save the file as follows on your desktop: com.usbmux.iproxy.plist .
Label
com.usbmux.iproxy
ProgramArguments
/usr/local/bin/iproxy
2222
22
RunAtLoad
KeepAlive
Head now over again to terminal and type line-by-line:
cd
cd /Desktop
chmod +x com.usbmux.iproxy.plist
Now the file got the right permissions set to work. Before we continue now. Head over to the “Finder” and choose “Go To” from the menu there and type in:
~/Library/LaunchAgents
Hit enter and you should be on the right place to copy now the plist-file into this directory.
Again head over to the terminal and type this line-by-line to start the “iproxy”:
cd ~/Library/LaunchAgents
launchctl load ~/Library/LaunchAgents/com.usbmux.iproxy.plist
Now the “iproxy”-service is launched and will run in the background and listens to the defined port for the idevice. To SSH via USB, simply type this in terminal and you are in:
ssh root@localhost -p 2222
The standard password, if not changed already should be: “alpine”.
I hope this will help you a lot. For more information about this and other options, head over to the original source, which helped me in understanding on how this should work.]
This replaces step 12 and 13 in this guide.
bro how to instal it please tel me step by step clearly & i updated terminal with brew update. any change in downgrading procedure ?
If you get the futurerestore error Abort Trap 6, just try the 4 lines in terminal. The guide above is still correct
hallo dear
please tell us how we can update step by step…
a lot of the thanks for you
Warning: openssl is a keg-only and another version is linked to opt.
Use `brew install –force` if you want to install this version
how can i do that!!! please
[Error] argument parsing failed! agrc=11 optind=9 my new error after doing this
Hi matt, finally end up with this error code.
Do not make a copy past of your command in terminal just type it
it says permission denied ,
any thing i need to download first ?
i am on jailbroken i6s 10.1.1. I want to upgrade to 10.2 without losing toutch id. Can you please tell me if the touch id works
yes if you use 10.2.1 sep and baseband, check what model your 6s is, n71ap or n71map, and also you need 2.41 baseband file from 10.2.1
Hi Josh
Thanks for your amazing tutorial !
I followed it and tried to use the nonce enabler method from Tihmstars before since iam on Jailbroken 9.3.3
Everything seemed to work fine but i finally cant get the right ticket.
I guess the iphone rebooted alone when i was studying the tuts (iam on vm and had usb problem) So this should have change the ticket in it while rebooting.
By the way i tried using the “probability attack version” with no result so far.
I would like to know if there is a way to get back to my IOS 9.3.3 in order to restart from the beginning.
I tried Irecovery tool but seems it didnt worked cant really figure out why.
Thanks again for your great work and ofc Thanks @Tihmstars too.
FYI, Was finally able to reboot using ReiBoot tool for mac. Will try again later with NonceEnabler.
I have 9.3.3 also. Any luck? Please give steps
root@root:~/Desktop/downgrade# ./futurerestore_macos
./futurerestore_macos: error while loading shared libraries: libzip.so.2: cannot open shared object file: No such file or directory
I get the same thing except i’m using Linux Ubuntu. ./futurerestore_linux: error loading shared libraries.so.2: cannot open shared object file: no such file or directory
anyone have a solution to this?
it not work,
it give me message
Referenced from: /Users/dr.abdo/Desktop/downgrade/./futurerestore_macos
Reason: image not found
Abort trap: 6
please help me to solve this problem
can i use this method to update my idevice from ios 9.3.3 to ios 10.2? I am using jailbroken iphone 5s
what this mean Last login: Thu Feb 2 02:14:51 on console
HJTs-Mac:~ hjt$ /Users/hjt/Desktop/Downgrade/futurerestore_macos ; exit;
dyld: Library not loaded: /usr/local/lib/libzip.dylib
Referenced from: /Users/hjt/Desktop/Downgrade/futurerestore_macos
Reason: image not found
Abort trap: 6
logout
Saving session…
…copying shared history…
…saving history…truncating history files…
…completed.
[Process completed]
Please clarify whether to use the shsh2 blobs from “apnonce-XXXXX” folder on the “noapnonce” folder for iphone 6s. I have checked with img4tool, and the shsh2 blob files from both “apnonce-XXXXX” and “noapnonce” are VALID.
Experimenting with shsh2 blob files from “apnonce-XXXXX” and then “noapnonce” SEPARATELY in futurerestore_macos yields the same results–i.e., futurerestore_macos runs continually without errors (just no luck downgrading). However, when trying to run all the shsh2 blobs together using the -t option, futurerestore_macos breaks with error code -2.
typo 1st line — read OR rather than on
I’ve been running prometheus for 2 hours now. Still no restore. Luckily I had already installed homebrew on my mac, if I hadn’t done that I probably would have given up cuz the tutorial doesn’t talk about hb. Not sure if this is gonna work, but I’ll wait for a while. If anyone has succeded using the non-jailbroken method, it would be nice to know that this actually works.
Mine went all night with no luck.. (nearly 24 hours)
Wow, mines been going for 6 hours now. Still nothing. I’m trying to downgrade 10.2.1 to 10.2 with one shsh2 blob, ip6. I lost almost all hope after I read your comment. I’ll keep it running for a bit longer tho. I’ll probably end up with your results as well 🙁
should include that the Xcode CL tools are required, as well as libzip and libplist (from brew)
https://www.reddit.com/r/jailbreak/comments/5ku39l/tutorialusing_prometheus_by_tihmstar_on_sierra/
It won’t work for me, it says for the reason is that the image is not found
So I’m using non-jailbroken method and it’s currently trying different APTicket/Nonce values..
Should it be opening that iTunes “there is a problem” dialogue box every single time?
Happy to wait for it to keep trying and trying, but just want to make sure it’s “going ok” right now..
Why is it not working on 10.2.1 (non-jailbroken?) I have my 10.2. blobs saved and want to downgrade (if that helps)
Apparently apple has patched Nonce collisions
well not sure what exactly they patched but I just restored my device from a apple boot loop on the apple screen from iOS 10.2 to 10.2 using my shsh files It worked for me in 1 min – with brute force style the NON jallbroken way. As I couldn’t get into my device so I had to put the phone into restore mode, Hint only using 1 shsh seemed to take over an hr with no luck. After reading the anonce responses I noticed a key that I had in another shsh that loaded but wasn’t checked against. I restarted the process with all the shsh files I had and VIOLA. restore successful. That was not expected, as what I’ve read and seen online.
What device so do you have? Also its on 10.2.1 the non jb method was patched apparently, i have tried using 13 different shsh at the same time. Also what exactly do you mean you found a key that wasn’t checked against?
cool, bookmarked, maybe I need in the future.. thank you 🙂
So what if you don’t fit either category. You said either jb on iOS 10 or not jb. I’m on jb 8.4 so what method do I use?
You can use the jailbreak method, but you need to add nonceEnabler to your device first. You can see how in Tihmstars own video https://www.youtube.com/watch?v=UXxpUH71-s4