
Downgrading and upgrading to unsigned iOS versions is a very hot topic among the jailbreak community. A couple of years ago a tool called ‘futurerestore’ was released by tihmstar, giving people the ability to restore to unsigned iOS versions if you have the correct SHSH blobs for it. Although he no longer updates it, members of the community have updated it themselves to be compatible with iOS 12.
This tool is somewhat complicated to use, but as long as you do everything correctly, you can restore an iOS device to an unsigned iOS version. This restore method is also not a perfect one, as it does have a few downsides. This main one being that it doesn’t work without already being jailbroken.
So why would you want to restore to iOS 12.1.2? The main reason everyone would want to restore their device to iOS 12.1.2 is to use the newly released Chimera jailbreak for iOS 12.0 – 12.1.2. If you are currently jailbroken on any other iOS version, you will most likely want to upgrade and keep your jailbreak if possible. Since iOS 12.1.2 is no longer being signed by Apple, you are not able to restore to it without using this method.
It should be noted, however, that this will only work while Apple is signing iOS 12.2 (or a newer version that has a SEP compatible with iOS 12.1.2). This means that when future versions of iOS are released, you may not be able to use this method to restore back to iOS 12.1.2. This method also requires that you have valid SHSH2 blobs saved for iOS 12.1.2. If you do not have these saved already, it is too late to save them as Apple no longer signs iOS 12.1.2. You should always save SHSH2 blobs for every iOS version. It is also worth mentioning that if you do not have SHSH2 blobs for iOS 12.1.2, you will not be able to use someone else’s, as these blobs are specific to each device.
UPDATE/WARNING: Using this guide with the SEP from iOS 12.2 may result in your device entering a reboot loop after 2 weeks. I would recommend waiting to do this until iOS 12.3 is released which hopefully won’t have this issue. If you do use this guide though, make sure not to set a passcode on your device, as this can trigger the reboot loop after 2 weeks.
Requirements & Notes
- This requires you to have SHSH2 blobs saved for iOS 12.1.2. If you do not have them saved already, you cannot do it anymore as iOS 12.1.2 is no longer signed by Apple.
- When using this method to restore to iOS 12.1.2, Touch ID WILL work. Sometimes when using this method Touch ID wouldn’t work after the restore, but iOS 12.1.2 and iOS 12.2 have the same SEP, so Touch ID works perfectly.
- This should work with all devices except A12 and A12X devices (iPhone Xs/Xs Max/Xr and iPad Pro 12.9″ 3rd Gen). This is due to all saved SHSH2 blobs for these devices being invalid. Read this Reddit post for more information.
- This will restore your device and erase all data on it. Make sure to backup in iTunes if you want to keep any data on your device.
- This exact method will only work while iOS 12.2 is being signed by Apple, however, it is possible to tweak it if you use files from the latest IPSW file instead.
- This method requires you to already be jailbroken. If you are not yet jailbroken, you can find out how using one of my guides here.
- If you are using a device that does not have an iOS 12.1.2 release, or you only have SHSH2 blobs for a similar version (e.g. 12.1.1), then replace all reference to iOS 12.1.2 in this guide with the version you want to use.
- If you get any errors with futurerestore or have any questions, please read this post before asking for help.
Download Links
Written Guide
- Create a folder on your desktop called ‘Restore’. This is where we are going to keep all of the files needed to restore. Keeping everything in one folder makes it much easier to work with.
- Download the IPSW files for iOS 12.2 and iOS 12.1.2 from here and save them in the ‘Restore’ folder you created. Make sure to select the correct IPSW’s for your device.
- Download the latest version of ‘futurerestore’ from here and save it in the ‘Restore’ folder you created. Extract the ZIP file and make sure the ‘futurerestore’ file is present. Move the ‘futurerestore’ file to the main ‘Restore’ folder. You can delete the ZIP and all other extracted files at this point.
- Once the iOS 12.2 IPSW file has finished downloading, right click on it and click ‘Rename’. Add ‘.zip’ onto the end of the filename to convert it from an IPSW to a ZIP file. You will get a pop-up asking you which extension you want to use. Make sure to select ‘.zip’. If you’re using Windows you can use an archive file manager such as 7Zip to open the IPSW file without changing it to a ZIP file.

- Double click on the new .zip file to extract its contents. You need to get 2 (if you are using a non-cellular device) or 3 (if you are using a cellular device) files from the extracted .zip file. These files are the ‘BuildManifest.plist’, the baseband (.bbfw file), and the SEP (.sep file).
Getting the BuildManifest.plist File
The ‘BuildManifest.plist’ file should be located in the folder you extracted from the ‘.zip’ file. Copy this file to the ‘Restore’ folder.
Getting the Baseband File (Only for Cellular Devices)
Getting the baseband is a little bit more complicated. The baseband files are located in the ‘Firmware’ folder within the extracted folder. Depending on the IPSW file you downloaded for your device, there may be multiple baseband files in this folder. If there are, you need to make sure you copy the correct one. To check which file is the correct one, you can use the table below. For example, if you are using an iPhone SE, the baseband version would be 7.55.01. Therefore, the baseband file would be named ‘Mav10-7.55.01.Release.bbfw’ (may begin with ‘ICE’ instead of ‘Mav’ for some devices). Once you have found the correct baseband file, copy it to the ‘Restore’ folder. Make sure you copy the .bbfw file and not the .plist file.Device Baseband Version iPhone 5s 10.56.00 iPhone 6/6 Plus
iPhone SE7.55.01 iPhone 6s/6s Plus 5.55.00 iPhone 7/7 Plus 5.55.00 or 3.03.04 * iPhone 8/8 Plus
iPhone X3.55.00 or 2.03.06 * iPhone Xs/Xs Max
iPhone Xr1.04.30 iPad Mini 2/3
iPad Air10.56.00 iPad Air 2
iPad Mini 4
iPad 5 (2017)
iPad Pro (12.9”)7.55.01 iPad 6 (2018)
iPad Pro (9.7”)
iPad Pro (12.9”) 2nd Gen
iPad Pro (10.5”)5.55.00 iPad Pro (11”)
iPad Pro (12.9”) 3rd Gen
iPad Air 31.04.30 * There are multiple possible baseband versions for this device. On your device check ‘Settings -> General -> About ->Modem Firmware‘ to see which lines up with your device.
 Getting the SEP File
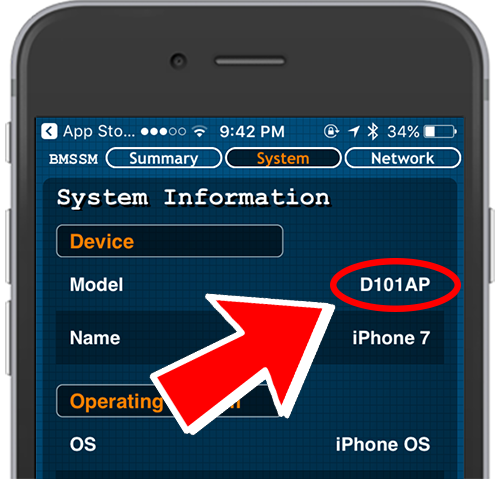
Similarly to the baseband, there are sometimes multiple SEP files in IPSW files for different devices or board configurations (which processor the device has). You need to get the correct SEP file or the restore will not work. To do this you will need to know what your devices board configuration is. You can find this using the free app store app Battery Memory System Status Monitor on your device. Install it and once open, navigate to the ‘System’ tab located at the top. At the very top, it should say the ‘Model’, followed by the board configuration (e.g. D221AP). SEP files are located in ‘Firmware/all_flash/’ within the extracted folder. For example, if your board configuration is D221AP, the SEP file would be in ‘Firmware/all_flash’. In here you should find a file named ‘sep-firmware.d221.RELEASE’ with the extension ‘.im4p’. Copy this file to the ‘Restore’ folder. Make sure to copy the .im4p file and not the .plist file. - Make sure your device is jailbroken. If you have not jailbroken, you can find out how using one of my guides here.
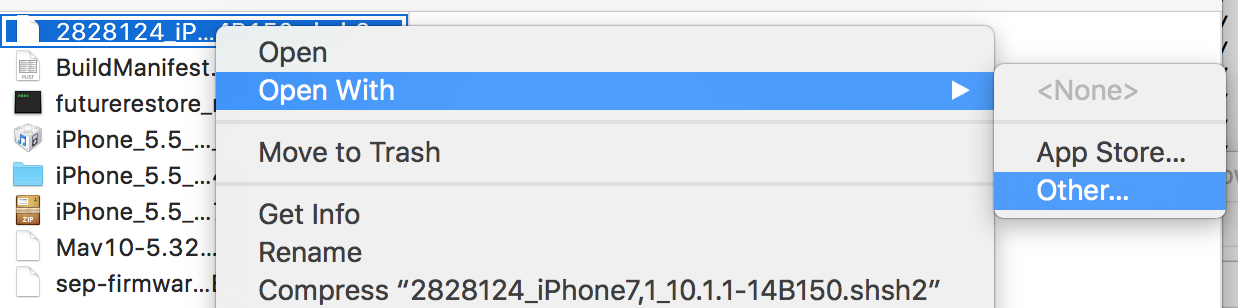
- Find your iOS 12.1.2 SHSH2 blob file and move it to the ‘Restore’ folder. For this to work, you need to get the generator from this file to put onto the iOS device later. To do this, open the file in a text editor of your choice (e.g. Notepad or Notepad++).
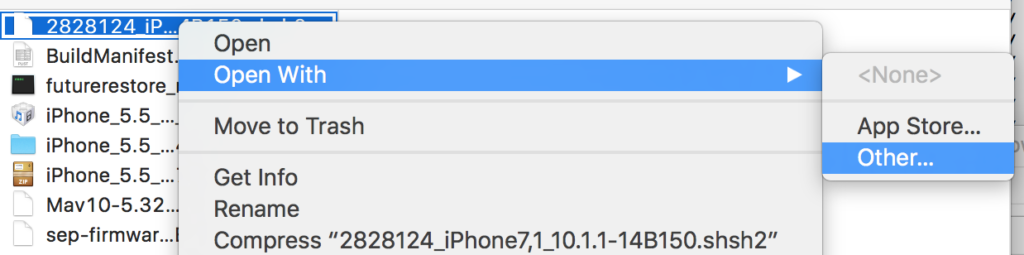
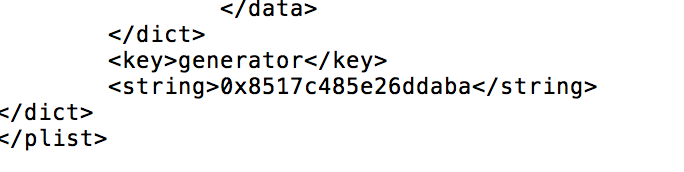
- Scroll down to the bottom of the SHSH2 file (or possibly somewhere in the middle) and you should see a ‘generator’ key, followed by a string of characters. This string is the generator you need to put onto your device later. Copy it and save it for later, or just keep the file open. If the file doesn’t have this, use another blob you have saved. Blobs saved with TSSSaver will have a ‘noapnonce’ version which will contain a generator.
- Now you need to use this generator to set the ‘nonce’ on your device. Most jailbreak apps such as Electra include a way to set the nonce. If your current jailbreak app doesn’t have this feature, you’ll need to use either NonceSet1112 (iOS 11.0 – 11.1.2) or PhoenixNonce (iOS 9.3.4 – 9.3.5). These apps can be sideloaded using Cydia Impactor.
- Open Command Prompt (Windows) or Terminal (Mac) and change directory to your ‘Restore’ folder by entering
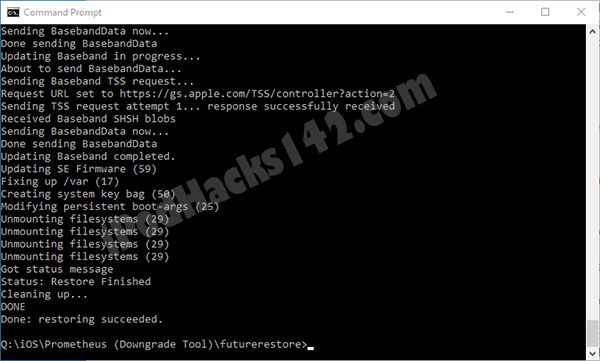
cd [Path to Folder], replacing the brackets with your folder path. - You can now attempt to restore the device. To do this enter the command below into Command Prompt or Terminal, replacing the parts in the brackets with your file names.
Windows:
futurerestore.exe -t [SHSH2 Blob] -b [Baseband File] -p BuildManifest.plist -s [SEP File] -m BuildManifest.plist [iOS 12.1.2 IPSW File]
Mac:
./futurerestore -t [SHSH2 Blob] -b [Baseband File] -p BuildManifest.plist -s [SEP File] -m BuildManifest.plist [iOS 12.1.2 IPSW File]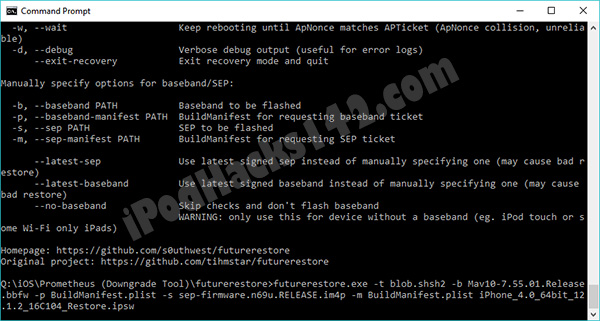
NOTE: If you are using a non-cellular device that doesn’t require a baseband, remove the-b [Baseband File] -p BuildManifest.plistpart from the command. You will also need to add--no-basebandto the end of the command. - If you did everything correctly, and your SHSH2 blobs are valid, your device should now start to restore to iOS 12.1.2. Make sure you do not unplug your device, or close Terminal during this process. If you do, you may be forced to restore to the latest iOS version and you will no longer be able to use this method. Once complete you can follow this guide to jailbreak.
ALSO SEE: How to Jailbreak iOS 12.0 – 12.1.2 (All Devices) Using Chimera Without Computer

This professional hacker is absolutely reliable and I strongly recommend him for any type of hack you require. I know this because I have hired him severally for various hacks and he has never disappointed me nor any of my friends who have hired him too, he can help you with any of the following hacks:
-Phone hacks (remotely)
-Credit repair
-Bitcoin recovery (any cryptocurrency)
-Make money from home (USA only)
-Social media hacks
-Website hacks
-Erase criminal records (USA & Canada only)
-Grade change
-funds recovery
Email: onlineghosthacker247@ gmail .com
Just to be sure, im on ios 12.2, my phone was jailbroken before but i had to update to the latest firmware because of the boot loop, can i still use this method to downgrade with my saved blobs? thankjs
i have the same problem on xs max after bootloop , its there an issue for bootloop after chimera jailbreak ???